I created these cards with Heartfelt Creations’ Sweet Serenity Collection – I love these nature and landscape scenic stamp images, and the lovely frame. Such fun to make and relaxing too. For the flowers, I used the Arianna blooms stamp and die set.


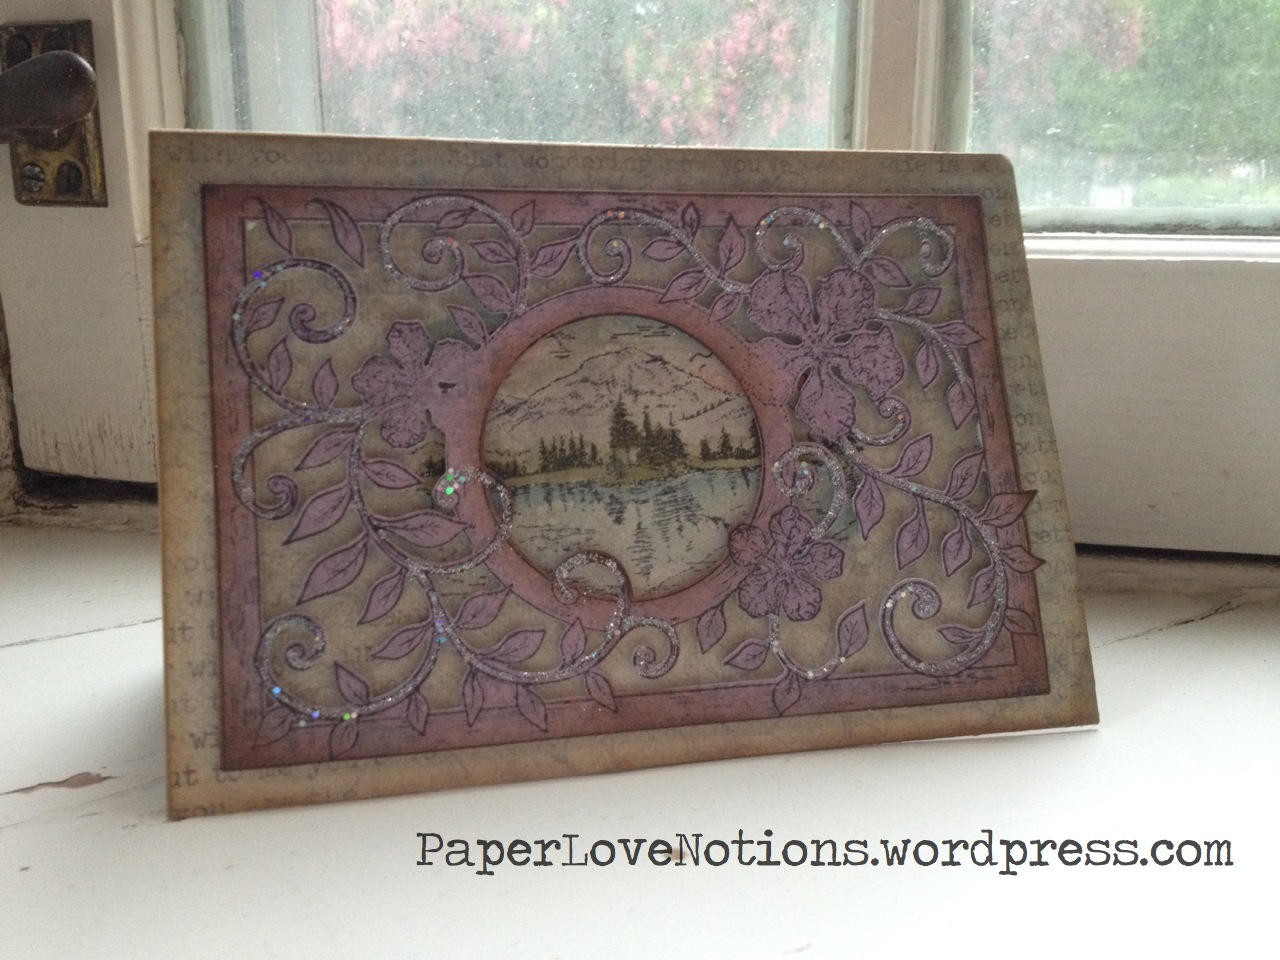
I created these cards with Heartfelt Creations’ Sweet Serenity Collection – I love these nature and landscape scenic stamp images, and the lovely frame. Such fun to make and relaxing too. For the flowers, I used the Arianna blooms stamp and die set.
Here are four new beautiful bloom cards that I made using Heartfelt Creations’ Arianna collection. Please feel free to leave a comment if you have questions, or subscribe to see when new posts are posted.
Thanks for reading, and have a great day!

To make this card:
1. Cut a piece of patterned paper 5.75 x 5.75 inches and adhere to a 6×6 card base. Cut a piece of white card stock to 4×4 inches and adhere to a 4.25×4.25 piece of kraft card stock.
2. Stamp the pretty swirls on white card stock – I used a rose-colored chalk ink. Stamp in black ink the Birthday sentiment, and color the swirl, B and leaves with markers. I used copic markers, but any type would work.Using foam dots, adhere this piece to the card as shown.
3. Stamp the Arianna blooms in black or brown ink onto white card stock and cut with the coordinating die. Color the flowers with the rose colored chalk ink using a sponge dauber – darkest on the tips of the flowers and lighter into the center. I then shaped the flowers using a round stylus and used glue in the centers and yellow prills for the centers.
4. Cut a swirl from the die set in black card stock. Adhere it to the paper and then adhere the flowers as shown. . I backed the white card stock square with kraft card stock, and attached it with foam dots to a 6×6 piece of patterned paper, and attached that to my base.
I adore this card – I hung it up beneath a photo of my children in spring outfits by the front door.
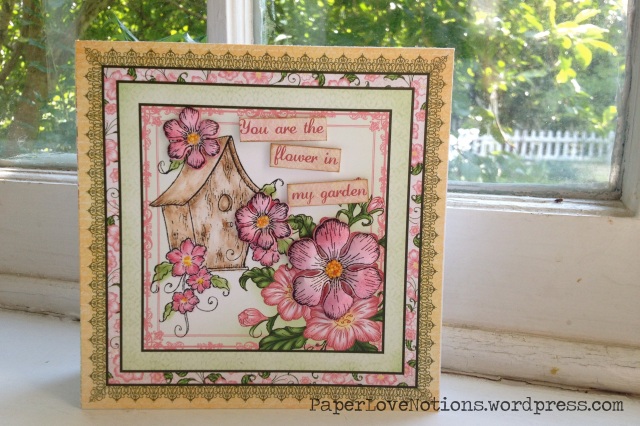
Instructions for this card:
1. Cut a 6×6 card panel out of the Arianna blooms patterned paper.
2. Stamp the bird house image on the panel in black or brown ink. Color in the image – I used brown distress ink on the house and pink and green chalk ink on the flowers.
3. Stamp the Arianna blooms in black or brown ink onto white card stock and cut with the coordinating die. Color the flowers with the rose colored chalk ink using a sponge dauber – darkest on the tips of the flowers and lighter into the center. I then shaped the flowers using a round stylus and used glue in the centers and yellow prills for the centers.
4. Cut from the paper one of the sentiments that says “You are the flower in my garden” from the patterned paper. Cut into three pieces and distress the edges with brown ink. Attach these pieces to the card with foam ink.
Thanks for reading and feel free to leave a comment and let me know what you’re creating!
This card was so fun to create. I found that creating the blossoms and coloring the country scene to be relaxing and I love how it turned out. It feels like a special card!

After a truly stressful and over-packed week of work in my law practice, I was so relieved to have hours last night to play and create with beautiful blossoms and a lovely card kit. Then I created my own card. I love how they all turned out and, right now, I would find it very hard to give any of them away (which of course I will eventually). In this post are photos of the cards I made from Heartfelt Creations card kit for the Arianna Blooms collection, which you can find >>here<<. In my next post I will show the card I created.


New Baby – Pink Stroller

This stroller die is so cute! And versatile – I’ll have to use its pieces to decorate other cards and layout, and it can be made into an umbrella also. I cut it out of pink card stock and sponged rose colored 3d stamp paint on top – the shimmer is perfect. I placed some tiny flat-backed pearls on the wheels. I cut the flowers out of one of the sheets of paper, shaped them and added pearl centers and a leaf from my stash. Then it was just cutting out a the “New Baby” ticket from the paper pad – this card came together very quickly.
I will post about the other three cards over the next two days. Thanks for stopping by!
Following up on my post from yesterday, here are photos and descriptions of another sweet lullaby card using the collection from Heartfelt Creations.
Happy Birthday Sweet Girl

This was another fast card! The card front already includes the frames and cute image. I cut the flowers out of the pink paper, shaped them and added pearl centers and wild orchid crafts leaves from my stash. I cut out the blank green journal spot from the paper pad and trimmed it to size on one end, then stamped “Happy Birthday” from one of the sweet lullaby stamp sets using vintage photo distress ink.
Thank you for reading and feel free to leave a comment or let me know what you have been working on.
Congratulations – Baby Shoe Card

This card was beyond easy and it is adorable!! The card front already had the cute image and frames. I used dries clear glue on the shoe (the metal tip on the glue makes this easy to control) and then sprinkled chunky glitter on top. I then stamped “Congratulations” from one of the sweet lullaby stamp sets using vintage photo distress ink. I just need to get a spray sealer to keep the glitter permanent.
Precious Little Angel Card


I made this card for my little girl. I stamped the little girl from one the sweet lullaby stamp sets using black memento ink. I cut it out with a spellbinders die (floral ovals) and colored her with chalks and accented her hat, dress, shoes and the puppy’s bow tie with distress markers – this is a quick coloring technique inspired by the Heartfelt Creations youtube video. I cut out the papers from the paper pad and added a pink ribbon to join them. Favorite part again – the flowers! I cut these flowers out with white card stock and colored them with the rose colored stamp ink, but left the centers white (my daughter wanted to know why). I also sponged on a bit of vintage photo distress ink on the petals. Then I shaped them, glued them together and added pearl centers. I think the coloring added dimension! I completed it with a few leaves from my stash and then the ticket sentiment from the paper pad. This card took a bit longer, but I love it!
Feel free to subscribe or leave a comment!
Heartfelt Creations has a lovely community. I wrote to their customer service email address and shared my first card – and they were so complementary and posted it on their Facebook site. I was very sweet.
I woke up in the middle of the night tonight – and not even because my two or four-year old children woke me up (not this evening anyway). So I made five more cards with the sweet lullaby papers, stamps and dies. Such fun! Maybe I’ll pay for it tomorrow – wink wink. Here is my baby boy card:
Baby Boy – a Gift of Love


I love how this card came out! I used a card front, stamped the Noah’s Ark image, then colored it with distress markers and a water pen. I stamped the Baby Boy pocket watch, but it out, and used vintage photo distress ink. I then cut out the “a gift of love” tag from the paper. My favorite part – the flowers! I die cut the flowers from the sweet lullaby die set using medium blue card stock and one of the blue papers from the paper pad, which I shaped, glued together and then used dries clear glue and some chunky silver glitter in the centers. I framed the little flowers with leaves from my stash.
I received my first Heartfelt Creations package yesterday (I say that because I was in love at first sight and I’m certain that this is only the beginning) – the Sweet Lullaby collection. That very night I made this card – a description of how I made it is below.

Sweet Lullaby baby girl card
To make:
1. Cut out 5×7 card panel from paper. This has an image of the baby in a cradle.
2. Using the flower dies, cut out two each of the three sizes in white cardstock. I use wax paper in between the layers so that the die cuts pop out easily.
3. Using a sponge, I lightly colored the flowers with pink 3d stamp paint in the color rose. I shaped the flowers using the technique shown on the Heartfelt Creations youtube.com video (linked here), and then glued them together, and glued on a flat-backed pearl center to each flower.
4. I arranged the flowers as shown and glued them down at their centers. I then tucked in a few white leaves from wild orchid crafts and glued them down.
5. I stamped the circle sentiments on white cardstock and cut out the one shown, and then ran a thin layer of moss green stamp paint around the permimeter. I used a distress marker in the color of spun sugar to make highlights on the center of the circle, and then glued that down.
6. Lastly, I used double stick tape to attach my card front to my card base, and then lightly distressed it with antique linen, and then vintage photo distress inks on the outside border.
Here is a link to the heartfelt creations stamps, dies and papers for the Sweet Lullaby collection.
I hope you enjoy this card, and have a great weekend!
