What a Hoot! Card

photo 17b5dd4f9-1387-4d74-8105-5dea0884c197

Happy Tuesday! Check out my crazy little owl! I used this super cute stamp set from CTMH, Chalk It Up! papers, and flaxen and sorbet ink pads. My four-year old daughter likes my card too, and I’m look forward to creating some owl friends with her. Stamping with different inks is one of her favorite types of art projects. This stamp was the August stamp-of-the-month, and isn’t available now, but here is a link to some other excellent Halloween stamps, like the stamp set above called Halloween Greetings.

I look forward to starting my fall crafts – the seasons changing, autumn holidays, and mindfulness of blessings. I have some banners planned, some candle wraps, and table centerpieces. Leave a comment with any fall crafts you have planned!

Cheers!

Tree of Love Cards

photo 3 photo 4

I made these cards using Close to My Heart’s September stamp set – until the end of the month, it’s $5 with an order of $50 or more, or $17 alone. I adore this tree with the two hearts in the center – I can see using it in a mini album and framed for the wall. Here’s how I made the first card:

1. Cut background patterned paper to 5×7. I used a paper from CTMH’s Chalk It Up paper collection, and cut it from the top of the sheet so that it would have the strip of blue along the edge.

2. I stamped the tree image in flaxen ink, and stamped the small hearts in sorbet ink around the tree. These colors match the paper line perfectly and they are gorgeous when the dry – and you can stamp right over them. I cut the white card stock around the tree, and adhered it to my background paper.

3. I stamped “Love” in black ink over the background paper below the tree.

4. I added a heart embellishment from the assortment that is part of the Chalk it Up collection.

I created my second card with some leftover papers and the love stamp in sorbet, and heart in flaxen ink.

photo 2

Have a great week and create!

Special Announcement!

I am excited to have just become a Close To My Heart Consultant! I am taking my passion for scrapbooking and card making to try something new. The products are versatile and high quality – clear stamps of all styles and occassions, papers, and how-to books. You can browse the catalog of products on my brand new website (link)—I recommend you start with some of my favorites (pocket scrapbooking and workshops on the go that are a kit and instructions to make the projects). Place an order or just plan on coming to my first online event on Sunday October 5. I will post additional information about my grand opening event soon!

Thanks!

14-ai-ctmh-products

More beautiful bloom cards

Here are four new beautiful bloom cards that I made using Heartfelt Creations’ Arianna collection.  Please feel free to leave a comment if you have questions, or subscribe to see when new posts are posted.

Thanks for reading, and have a great day!

card2

To make this card:

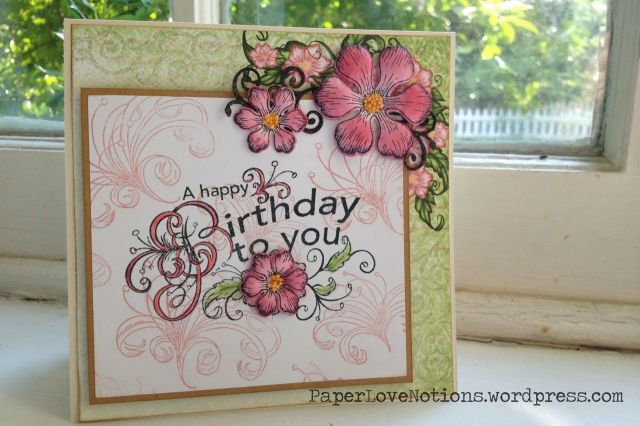
1. Cut a piece of patterned paper 5.75 x 5.75 inches and adhere to a 6×6 card base. Cut a piece of white card stock to 4×4 inches and adhere to a 4.25×4.25 piece of kraft card stock.

2. Stamp the pretty swirls on white card stock – I used a rose-colored chalk ink. Stamp in black ink the Birthday sentiment, and color the swirl, B and leaves with markers. I used copic markers, but any type would work.Using foam dots, adhere this piece to the card as shown.

3. Stamp the Arianna blooms in black or brown ink onto white card stock and cut with the coordinating die.  Color the flowers with the rose colored chalk ink using a sponge dauber – darkest on the tips of the flowers and lighter into the center.  I then shaped the flowers using a round stylus and used glue in the centers and yellow prills for the centers.

4. Cut a swirl from the die set in black card stock. Adhere it to the paper and then adhere the flowers as shown. . I backed the white card stock square with kraft card stock, and attached it with foam dots to a 6×6 piece of patterned paper, and attached that to my base.

I adore this card – I hung it up beneath a photo of my children in spring outfits by the front door.

card1

Instructions for this card:

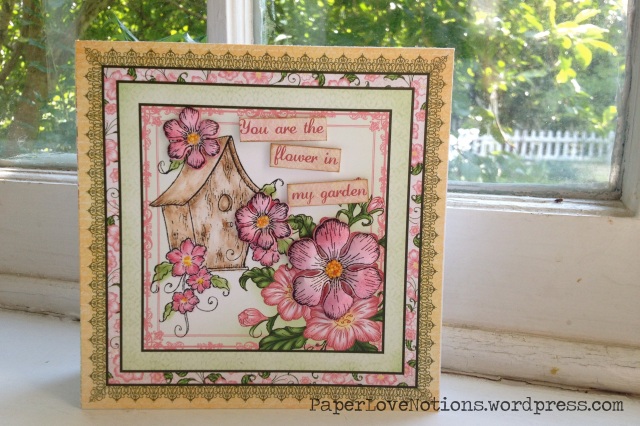
1. Cut a 6×6 card panel out of the Arianna blooms patterned paper.

2. Stamp the bird house image on the panel in black or brown ink. Color in the image – I used brown distress ink on the house and pink and green chalk ink on the flowers.

3. Stamp the Arianna blooms in black or brown ink onto white card stock and cut with the coordinating die.  Color the flowers with the rose colored chalk ink using a sponge dauber – darkest on the tips of the flowers and lighter into the center.  I then shaped the flowers using a round stylus and used glue in the centers and yellow prills for the centers.

4. Cut from the paper one of the sentiments that says “You are the flower in my garden” from the patterned paper. Cut into three pieces and distress the edges with brown ink. Attach these pieces to the card with foam ink.

Thanks for reading and feel free to leave a comment and let me know what you’re creating!